
4 One-Tin Bakes To Make This Week

For the recipes below, you’ll need a 23 x 33cm (9 x 13in) cake tin (commonly used for brownies). Don’t worry, you won’t end up with bakeware falling out of every cupboard and hidden under your bed. The obvious question is why this tin? Why not a sheet pan, a set of round cake tins or even a loaf pan? This tin is the most flexible, the most multipurpose, the most useful tin there is. It is a mainstay of any baker’s arsenal, and in my book, it should be the hero. In it, you can make cookies, cakes, desserts, brownies, pies and tarts. In fact, if you can bake it, you can probably bake it in one of these tins. It’s already popular, and if you bake already, there’s a good chance you already own one. If you don’t, you’ll find them in every cookware shop going.
The recommended style is an aluminium tin. It’s a classic bakeware choice and will happily stand the test of time. It tends to bake and brown evenly and is lightweight. My favourite comes from Nordicware, one of the oldest and best bakeware manufacturers in the world. The one style to avoid is a non-stick tin with a dark/black coating. These absorb and distribute heat more quickly, leading to recipes browning too much and possibly burning. They are also more prone to damage. If this is the tin you already own, then bake at a slightly reduced temperature and check it a few minutes earlier than the recipe calls for.
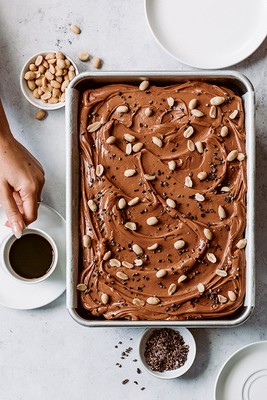
Milk Chocolate Caramel Sheet Cake (Serves 12–15)
This recipe is the reason this book exists. One early version came with me to the local pub, and once my friends had devoured most of it, we handed out the rest to strangers – a cake is still the best way to make friends. The ganache is made with a bittersweet salted caramel and topped with peanuts and cacao nibs. If there is one cake to try, it’s this one.
INGREDIENTS
For the caramel ganache:
- 200g of milk chocolate, finely chopped
- 400ml of double cream
- 200g of caster sugar
- 50g of unsalted butter
- 1 tsp of flaked sea salt
- 1 tsp of vanilla extract
For the chocolate sheet cake:
- 250g of plain flour
- 75g of cocoa powder
- 1 tsp of baking powder
- 2 tsp of bicarbonate of soda
- ½ tsp of fine sea salt
- 300g of light brown sugar
- 2 large eggs
- 100ml of neutral-tasting oil (or olive oil, if you prefer), plus extra for greasing
- 225ml of sour cream
- 225ml of hot brewed coffee
To decorate:
- Salted peanuts
- Cacao nibs
METHOD
- First, make the ganache as it needs to chill before use. Place the chocolate in a large, heatproof bowl. Pour the cream into a small saucepan, bring to a simmer, then remove from the heat.
- Heat the sugar in a medium-sized saucepan over a medium heat until melted and the colour of an old copper coin. Add the butter, salt and half the warm cream. Once the bubbling has subsided, you should have a smooth caramel. If not, reduce the heat and stir until smooth. Pour in the remaining cream and the vanilla and stir to combine.
- While still hot, pour the caramel over the chocolate and leave for a couple of minutes, then stir until a smooth ganache. Cover and refrigerate for a couple of hours or until the texture of buttercream, soft and scoopable. If you leave it too long it will thicken and whipping the ganache will become tough.
- Preheat the oven to 180°C (350°F), Gas Mark 4. Lightly grease the baking tin and line with a piece of parchment paper that overhangs the two long sides of the tin, securing in place with metal clips.
- Sift the flour, cocoa powder, baking powder, bicarbonate of soda, salt and sugar into a large bowl and whisk to combine. Make a well in the middle, pour in all the remaining ingredients and whisk everything together just until smooth.
- Pour the batter into the prepared tin and spread evenly. Bake for 25-30 minutes or until the cake springs back to a light touch and is starting to pull away from the tin’s sides. Because the cake is on the large side, it is a little harder to manoeuvre, so cool in the tin for 20-30 minutes, before using the overhanging parchment paper to lift it to a wire rack to cool completely.
- Use an electric mixer to whisk the ganache for a few minutes until smooth and shiny (over-whisking can make it grainy, so err on the side of caution). Spread over the cake, then sprinkle liberally with peanuts and cacao nibs. Cut into portions and serve. Store in a sealed container for 4-5 days.
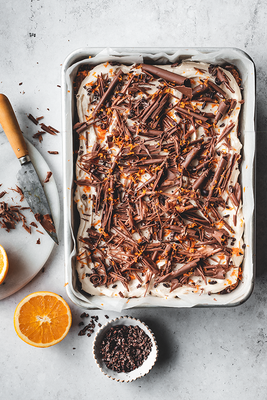
Chocolate & Cardamom Carrot Cake With Brown Butter Cream Cheese Frosting (Serves 12–14)
For the last ten years my brother-in-law has badgered me to put a chocolate orange carrot cake into one of my books. The truth is it was more fun to wind him up than admit it would work, so it’s time to end the joke and give him a recipe. My interpretation has vaguely Scandi spicing and the best brown butter cream cheese frosting you’ve ever had, tasting like a toasty rich caramel.
INGREDIENTS
- 300g of plain flour
- 2 tsp baking powder
- ½ tsp fine sea salt
- 2 tsp of ground cinnamon
- 1 tsp of ground cardamom
- Zest of 2 oranges, juice of 1
- 300g of carrots, grated
- 75g of dark chocolate chips
- 150g of raisins or sultanas
- 4 large eggs
- 400g of light brown sugar
- 240ml of light olive oil, plus extra for greasing
- Milk chocolate shavings
- Finely grated zest of 1 orange
For the cream cheese frosting:
- 75g of unsalted butter, at room temperature
- 125g of full-fat cream cheese, at room temperature
- 400g of icing sugar
- ¼ tsp of fine sea salt
- 2 tsp of vanilla extract
METHOD
- Preheat the oven to 180°C (350°F), Gas Mark 4. Lightly grease the baking tin, then line with a piece of parchment paper that overhangs the two long sides.
- Place the flour, baking powder, salt, ground spices and orange zest into a large bowl and whisk together to combine. Add the carrots, chocolate chips and raisins. In a separate bowl, whisk together the eggs, sugar, olive oil and juice from 1 orange, mixing until combined. Pour the wet mixture in the bowl with the flour and stir together until everything is combined. Pour the cake batter into the prepared tin and spread into an even layer.
- Bake for 35-40 minutes, or until the cake springs back to a light touch or a skewer inserted into the middle comes out clean.
- Leave to cool in the tin for 20 minutes, then use the lining paper to carefully lift and transfer the cake to a wire rack to cool completely.
- Place the butter into a small saucepan over a medium heat, stirring frequently. As the butter cooks it will first melt and then sizzle, splatter and then start to foam with little brown flecks. Pour into a bowl and refrigerate, stirring occasionally, until the butter is firm. Remove from the refrigerator and beat with an electric mixer, on its own, until soft and creamy.
- To make the cream cheese frosting, place the butter and cream cheese into a large bowl and use an electric mixer to beat on medium-high speed for 2-3 minutes, or until smooth, creamy and fully combined. Add the icing sugar, salt and vanilla and mix on slow speed until the sugar has combined with the butter mixture, then mix on medium-high speed for 4-5 minutes, or until light and fluffy.
- Spread over the top of the cake and finish with a grating of milk chocolate and the zest of another orange, if you like. Kept covered, this cake will keep for 3-4 days.
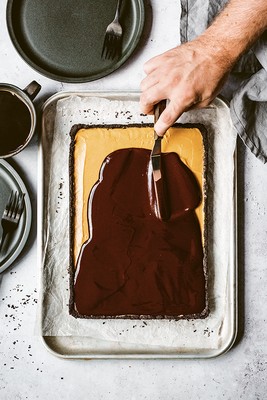
Peanut Butter Chocolate Tart (Serves 12–14)
Sometimes there isn’t the patience or time to make pastry. In those times, turn to cookie crusts – tart cases made with a mixture of cookie crumbs and butter. They’re incredibly quick and simple to throw together, but they do have one downside: they’re not the easiest to remove from the tin, so they’re best served in it. The way around this is to mix in an egg white, which acts like glue, holding all of the ingredients together. For this tart, the flavours mimic two of my favourite candy aisle treats, peanut butter cups and Oreos, a candy and cookie which are pretty much perfect.
INGREDIENTS
For the Oreo crust:
- 36 Oreos cookies
- 60g of unsalted butter, melted and cooled
- 1 large egg white
- ¼ tsp of flaked sea salt
For the peanut butter filling:
- 315g of smooth peanut butter
- 45g of unsalted butter, at room temperature
- 60g of icing sugar
- 1 tsp of vanilla bean paste
- 360ml of double cream
For the chocolate topping:
- 200g of dark chocolate (60-70% cocoa solids), finely chopped
- 60ml of double cream
- 15g of unsalted butter
- Flaked sea salt, for sprinkling
METHOD
- For the crust, place the Oreos into a food processor and process to fine crumbs. Pour in the melted butter egg white and salt, and process until evenly mixed. Tip the crumb mixture into the prepared tin and press evenly across the base and a little up the sides of the tin. Refrigerate for 20 minutes.
- Preheat the oven to 180°C (350°F), Gas Mark 4 and line the baking tin with a large piece of parchment paper that covers all the sides of the tin.
- Bake the crust for 12-15 minutes, or until set. If the crust loses definition as it bakes, use a glass to gently press back into shape. You can serve the tart in the baking tin, if you prefer, but the benefit of lining the tin and making the crust with egg white means that you can carefully lift the baked tart from the tin (once thoroughly chilled) and assemble and serve it on a platter.
- For the filling, beat the peanut butter, butter, icing sugar and vanilla together in a bowl until smooth. Pour in a quarter of the cream and mix until combined, then repeat with a further quarter of the cream. In a separate bowl, whip the remaining cream until it holds soft peaks, then carefully fold this into the peanut butter mixture, in two separate additions. Spread the filling into the tart crust in an even layer and refrigerate while you make the topping.
- Place the chocolate and cream into a heatproof bowl set over a pan of simmering water (ensuring the bottom of the bowl doesn’t touch the water underneath) and heat, stirring occasionally, until fully melted. Remove the bowl from the heat and add the butter, stirring until combined. Allow to cool for 5 minutes, then pour over the filling and spread into an even layer.
- Return the tart to the refrigerator for 20-30 minutes, or until the chocolate topping has set. Sprinkle with a little flaked sea salt and cut into thin slices to serve. This tart is best served on the day it’s made.

Tahini Chocolate Chip Cookie Bars (Makes 16)
Chocolate chip cookies are a constant in my house, whether it is a batch resting in the freezer waiting for an emergency, or a batch of these cookie bars for when you want to skip the shaping and get these baked nice and fast – especially good for when friends come over unannounced. The tahini in this recipe adds a warm nuttiness that is more subtle than peanut butter, but adds a great depth of flavour that makes these bars really sing.
INGREDIENTS
- 100g of unsalted butter, diced, plus extra for greasing
- 280g of plain flour
- ¾ tsp of bicarbonate of soda
- 1 tsp of flaked sea salt
- 75g of tahini
- 125g of caster sugar
- 125g of light brown sugar
- 1 large egg, plus 1 large egg yolk
- 1 tsp of vanilla extract
- 250g of dark chocolate, roughly chopped
METHOD
- Preheat the oven to 180°C (350°F), Gas Mark 4. Lightly grease the base of the baking tin, then line with a piece of parchment paper that overhangs the two long sides. Secure the paper in place with two metal clips.
- Add the flour, bicarbonate of soda and salt to a separate bowl and whisk briefly to combine. Add the tahini and both sugars to the bowl of melted butter, then use an electric mixer to whisk everything together for about 5 minutes, until the mixture is combined and lightened. Add the egg, egg yolk and vanilla and mix briefly to combine. Add the flour mixture and gently mix until most of the flour has been absorbed, then stir in the chocolate until evenly distributed.
- Scrape the cookie dough into the prepared baking tin and gently press into an even layer. Bake for 25-30 minutes, or until golden. Leave to cool completely in the tin. Use the parchment paper to lift the cookie mixture from the tin and then cut into squares using a large, sharp knife. Store in a sealed container for 3-4 days.
NOTE: For this recipe, roughly chop the bars of chocolate to get different sized pieces, which gives a more interesting taste and texture. Tahini also pairs beautifully with milk chocolate, so use whatever you prefer.
One Tin Bakes by Edd Kimber is published by Kyle Books, £17.99. Photography by Edd Kimber. Visit Amazon.co.uk
more from
Food


DISCLAIMER: We endeavour to always credit the correct original source of every image we use. If you think a credit may be incorrect, please contact us at info@sheerluxe.com.