Fresh Ways To Cook With Chocolate
It’s no secret that I have a passion for chocolate. In fact, a lifelong love affair might be a more accurate description. I love the joy it brings, how versatile it is and, of course, the taste. I’m a firm believer that there’s never a wrong time to enjoy it.
While others were busy playing sport or dating boys, I was in the kitchen. Cooking and feeding other people was my creative outlet, a by-product of an eating disorder that I struggled with in those early years. Before I’d turned 13, I had started taking orders, making a dozen birthday cakes every weekend. School fell away, and baking became my entire life. At 15, when I’d developed a healthier relationship with food, I embraked on a patisserie apprenticeship. I never looked back.
To this day, I still love nothing more than sharing my passion for cooking. It’s what motivated me to launch Savour, a first-of-its-kind chocolate and patisserie school, which helps cooks of all levels create incredible dishes and recipes.
Chocolate has taken me around the world. From President of the Jury for Taste for the World Chocolate Masters to the battleground of MasterChef challenges, and it’s even set the stage for my own TV show, The Chocolate Queen. It’s also motivated me to juggle running a business while raising a family – a journey made possible only with persistence and plenty of smiles.
Feeling inspired? Here, Kirsten shares three recipes to try...

Glossy Chocolate Brioche Buns
These light, soft, pillowy buns are bursting with chocolate bits and just the right amount of spice. Are you more of a brioche loaf lover? No problem. This recipe can be used to create exactly that – just increase the baking time. These glossy little buns are sensational served warm. You’ll need to start them a day ahead as they need to prove overnight.
Place the flour, sugar, salt and yeast in the bowl of a stand mixer with a dough hook attachment and mix on medium speed for approximately 1 minute.
Place the eggs and water in a bowl and whisk to combine. Stream the egg mixture into the flour mixture with the mixer on low/medium speed.
Add the cinnamon and nutmeg and mix to incorporate – ensure there are no dry ingredients remaining on the bottom of the bowl. Continue to mix on medium speed for 10 minutes. With the mixer running, gradually add the butter cubes over 5 minutes. Once the butter has been incorporated, continue to mix for a further 15 minutes.
Lastly, add the chocolate and mix to incorporate.
Transfer the dough to a bowl lightly greased with vegetable oil spray and cover tightly with plastic wrap. Set aside to prove at room temperature for 30 minutes. Place in the fridge overnight.
Lightly spray your work surface, scales and hands with vegetable oil spray, then divide the dough into 10 pieces and roll into balls.
Place the buns on a baking tray lined with baking paper, ensuring there is space between them to allow them room to spread out. Cover loosely with plastic wrap and leave to sit at room temperature for 3.5-4 hours.
Make an egg wash by whisking the egg and milk in a bowl to combine. Set aside.
Preheat the oven to 170°C Fan (325°F). Brush the surface of the buns with the prepared egg wash, then bake for 13 minutes, until golden brown.
Remove the buns from the oven and leave them to cool slightly before serving. The buns are best eaten within 2-3 days of baking. Store them in an airtight container at room temperature.
FOR BEST RESULTS
- It’s best to leave the butter out at room temperature overnight.
- You can stop the process of the dough developing at any stage by freezing it.
TO TAKE THINGS TO THE NEXT LEVEL
- Add some dried fruit to the dough at the same time as you add the chocolate for some additional pops of flavour.
- Pipe a cross on top of the buns to convert these to hot cross buns.

Caramel Slice Topped With Milk Chocolate Ganache
Just when you think a caramel slice (sometimes known as millionaire’s shortbread) can’t get any better, you can move to this new level of decadence. What makes this caramel slice so good? Chocolate, of course. Here you’ll find it nestled in the biscuit base, humming in the caramel filling and crowning this slice in the form of a glossy ganache.
To make the biscuit base, preheat the oven to 160°C Fan (315°F). Grease a slice tin measuring 27.5 x 17.5 cm and 3.5 cm high. Line the base and sides of the tin with baking paper and set aside until required.
Put the melted butter and brown sugar in a bowl and mix with a wooden spoon to combine. Add the flour, coconut and cinnamon. Continue to mix until the ingredients come together. Add the milk chocolate and mix to combine.
Press the mixture into the base of the prepared baking tin to create an even layer. Bake for 15 minutes.
Remove from the oven and set aside at room temperature. Reduce the oven temperature to 140°C Fan (275°F).
For the caramel filling, combine the butter, brown sugar and vanilla in a saucepan over medium heat.
Once the butter has melted and the sugar has completely dissolved, reduce the heat to low, add the condensed milk and whisk continuously until the mixture begins to simmer. Continuing to whisk, cook for a further 3 minutes until the mixture begins to thicken slightly.
Remove from the heat and add the dark chocolate. Mix until the chocolate is melted and incorporated into the caramel. Pour the caramel filling over the biscuit base and spread to create an even layer. Bake for approximately 25 minutes. Remove from the oven and leave the slice to cool completely at room temperature.
For the ganache topping, place the chocolate in a bowl. Combine the cream, vanilla, glucose and salt in a saucepan over medium heat. Bring to the boil, then pour the mixture over the chocolate. Gently whisk until the chocolate is completely melted and incorporated into the other ingredients.
Pour the ganache over the cooled caramel layer and spread evenly. (For a less rich version, make the slice without the ganache topping.) Place the slice in the fridge for 30 minutes to set.
Remove the caramel slice from the tin and cut it into 18 rectangles. Store the slice in an airtight container at room temperature for up to 2 weeks.
TO TAKE THINGS TO THE NEXT LEVEL
- To add a little dazzle, rub some edible gold lustre dust into shaved r shredded coconut and sprinkle it on top of each bar.

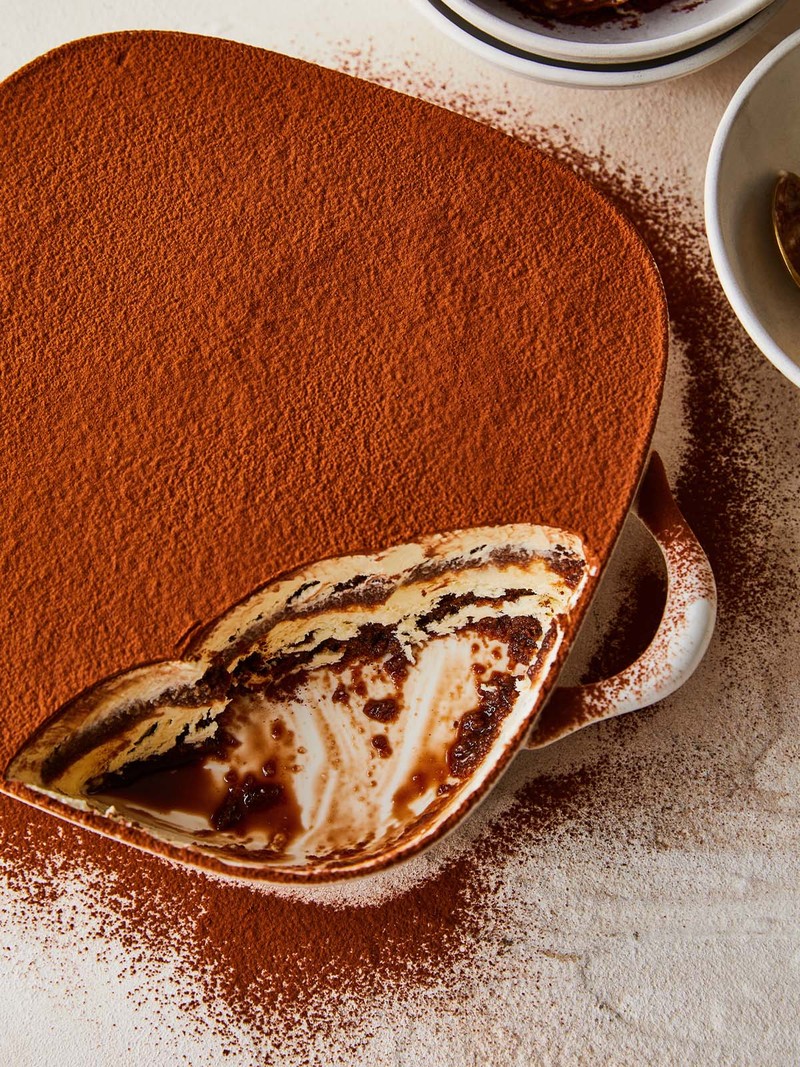
Tiramisu With White Chocolate Ice-Cream & Coffee Soak
Prepare yourself for classic tiramisu vibes but in ice cream form. Think creamy white chocolate ice cream with a traditional hint of mascarpone, sponge fingers soaked in fragrant Marsala-spiked coffee, dusted with rich cocoa powder. For perfect dinner party portions, prepare the recipe as eight individual serves.
To make the ice cream, combine 150ml of the cream, the mascarpone and vanilla in a saucepan over medium heat and bring to the boil.
Put the white chocolate in a bowl. Pour the hot mixture over the chocolate and whisk until it is completely melted and incorporated. Add the remaining cream and whisk to combine.
Cover with plastic wrap touching the surface of the mixture and place in the fridge for a minimum of 5 hours.
Add the condensed milk and salt to the chilled white chocolate mixture and whisk until it forms soft peaks. This can be done in a stand mixer with a whisk attachment or with hand-held electric beaters. Ensure the cream mixture doesn’t sit out of the fridge before whipping as it needs to be very cold to prevent the mixture from splitting. Place in the freezer for up to 1 hour while you prepare the coffee soak.
Combine the water and sugar in a saucepan over high heat and bring to the boil. Once the sugar has completely dissolved, remove from the heat and add the cocoa powder, coffee and Marsala. Mix to combine. Leave to cool at room temperature.
Dip half the sponge fingers in the coffee soak until they feel well soaked. You can test one by breaking it in half to see how far the coffee mixture goes in. You are aiming for it to soak the sponge finger almost to the centre.
Arrange the sponge fingers over the base of a 23cm square dish or baking tin. Spread half of the ice cream mixture over the sponge fingers to create an even layer. Repeat with another layer of coffee-soaked sponge fingers and ice cream mixture. Generously dust the surface with cocoa powder, then place in the freezer for a minimum of 4 hours.
Store in the freezer for up to 4 weeks and serve frozen. Take the tiramisu out of the freezer and place it in the fridge for 30 minutes before serving, to soften it slightly.
FOR BEST RESULTS
- Ensure that the sponge fingers are well soaked when assembling.
- If you overwhip the ice cream base, simply fold through a small amount of chilled cream.
Chocolate All Day by Kirsten Tibballs (published by Murdoch Books, £22) is available to buy now. Visit Amazon.co.uk
DISCLAIMER: We endeavour to always credit the correct original source of every image we use. If you think a credit may be incorrect, please contact us at info@sheerluxe.com.
/https%3A%2F%2Fsheerluxe.com%2Fsites%2Fsheerluxe%2Ffiles%2Fwebsite-images%2F2025%2F03%2Fsign-up-pop-up.jpg)
