How To Perfect Your Pastry At Home

A pastry revival is taking the world by storm – and I am excited by it. Top restaurants have once again been featuring pies and pithiviers on their menus, artisan bakeries have been opening up aplenty, and Instagram is awash with pie art and viennoiserie. It is safe to say pastry of all varieties is firmly back in vogue.
There’s pastry and then there’s pastry. The first is pale, mass-produced, tasteless, and often wrapped around a questionable filling. The second is hand-crafted, beautifully made and golden, delivering both excellent texture and depth of flavour. These pastries are quite simply incomparable – lovingly made pastry is the starring role of a dish, not merely a vehicle to carry its contents.
Being creative with pastry is my favourite pastime. The hours I have spent honing my skills have been the most peaceful of my life. I find the whole process soothing; those mindful hours spent making pies have given both clarity of mind and a renewed sense of creativity.
The most important aspect of making and baking with pastry should always be the eating. I have many food memories, yet it is the ones enveloped in pastry that are the most memorable. My nana’s custard tart, mince pies at Christmas, an unctuous oxtail pie and sfogliatella, to name just a few. Although all are very different, I fondly remember each of them because of the pastry: crisp, golden and flaking, just as it should be. Would they be as memorable if they had been under-baked, flabby and disappointing? Definitely not.
Pastry is the nemesis of many. I really want to change that. My aim in writing this book was to eliminate these shortcomings from the outset, to ensure that making and baking with pastry would be a pleasurable, peaceful and successful experience for all. How? By simplifying each process and cutting out the jargon, creating easy-to-follow, failsafe recipes that require neither expensive nor professional equipment, nor a degree in patisserie.
I have willingly encountered every problem possible during testing, so you don’t have to. I have seen the buttery layers between puff pastry rupture and choux buns deflate, crack and wither before my eyes. My inverted puff pastry has misbehaved in all ways imaginable and I have had more tears in my sheet pastry than a colander has holes. With that in mind…
Patience is key. Try to skip a step or save a few minutes here and there, rush any stage of making – right through to baking – and the pastry will undoubtedly suffer for it and ultimately your time will be wasted. So, hone your skills, pass them down and keep the revival going.
Inspired? Here are three recipes to try yourself…
Nana Maud’s Custard Tart (Serves 8-10)
My mother was a great cook, so too was her mother. Because of their love of cooking and feeding, many of my fondest childhood memories are food related. Their food was simple, rustic and frugal, but it was always delicious and served with love. There were a few standout dishes – those that I can almost taste when thinking of them – including the best roast beef dinner, a juicy black pudding and lamb tatty pot, condensed milk on toast, and this… Nana Maud’s epic custard tart.

INGREDIENTS
For the pastry:
- 230g of plain flour
- 125g, plus 1 tbsp, of cold unsalted butter, cut into 1cm cubes (no need to be precise)
- 50g of icing sugar
- 1 egg yolk
- 2 tbsp of milk
For the filling:
- 170g of egg yolks
- 85g of granulated sugar
- 500ml, plus 2 tbsp, of double cream
- Fresh nutmeg, for grating
METHOD
-
First make the pastry. Place the flour and butter into the bowl of a freestanding mixer and attach the paddle beater. Mix on a medium speed until the butter has been incorporated into the flour and resembles fine breadcrumbs. Add the icing sugar and mix for a few seconds before adding the egg yolk and milk. Continue to mix until a cohesive dough forms – this should only take 30-60 seconds, depending on your mixer. Turn out the pastry onto a work surface – there’s no need for more flour – and bring it swiftly together with your hands, without overworking it.
-
Lay out a long sheet of cling film and place the dough on one half. Flatten the pastry with the palms of your hands, then fold the remaining cling film over the top, fully encasing the dough. Roll out swiftly between the cling film to an approximate depth of 5mm, trying your best to keep it in a circular shape. Place in the fridge for at least an hour before using.
-
After resting it in the fridge, line, blind bake and trim your pastry case (use a loose-bottomed 18 x 4cm circular tin). Leave the baked case inside the tin.
-
Preheat the oven to 120ºC – I strongly recommend using an oven thermometer for this, unless you really know your oven.
-
Place the egg yolks in a large bowl, and add the sugar to a pan with the cream over a low heat. Allow the sugar to dissolve, then heat very gently until it reaches 37ºC. Pour this over the egg yolks, mix to combine – trying your best not to incorporate too much air – then strain through a sieve into a jug or something that can be easily poured from.
-
Position a baking tray in the oven, fairly low down, and remove all the racks above. Place the pastry case onto the baking tray, then pour the custard into the tart shell, filling as close to the top as possible. Grate a blanket of nutmeg over the surface and bake for 40 minutes before checking the wobble. My trick is to very gently bang on the closed oven door, looking at the wobble through the glass. A slight ripple towards the centre is what’s needed. If the ripple extends further, bake for up to 15 minutes more, but check the wobble after each additional 5 minutes. I guess knowing the perfect wobble comes from practice – practice and knowledge that the tart will set further upon cooling.
-
Remove from the oven and allow to cool completely at room temperature before removing from the tin. Slice into generous portions to serve. No accompaniments are needed here, it is quite simply perfection as is.
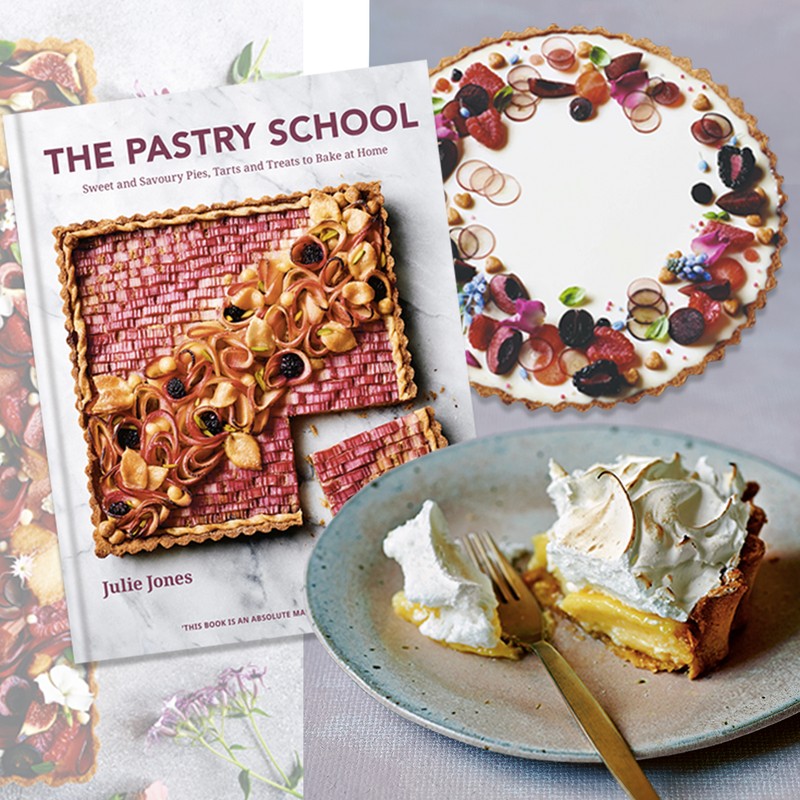
Roasted Rhubarb & Raspberry Tart (Serves 6)
Fruit tarts are so delicious yet simple. Pastry, custard, fruit… that’s it. I never feel the need to glaze the fruit as the natural flavours and vibrant colours are splendid enough as they are. The arrangement of the fruit is what gives this tart the wow factor, and for that reason it is among my favourite things to make. I can faff about for ages creating a beautiful fruit topping, adding texture with pastry shapes and bursts of fresh flavour with herbs and edible flowers. I have used a selection of summer fruits here, but really you can use anything you like, depending on season, availability and personal preference.

INGREDIENTS
For the pastry:
- 230g of plain flour
- 125g, plus 1 tbsp, of cold unsalted butter, cut into 1cm cubes (no need to be precise)
- 50g of icing sugar
- 1 egg yolk
- 2 tbsp of milk
For the crème pâtissière:
- 4 egg yolks
- 85g of caster sugar
- 60g of plain flour
- 330ml of milk
- 1 tsp of vanilla bean paste
For the rhubarb:
- 200g of rhubarb
- 75g of caster sugar
- Aromatic spices, star anise and cardamom work well (optional)
- Juice of 1 clementine, or 50ml of water
Fruit:
- Raspberries
- Red-fleshed plums
- Baby figs
- Cherries
- Blueberries
- Black seedless grapes
To finish:
- Baked pastry shapes (optional)
- Greek basil (optional)
- Edible flowers (optional)
METHOD
- First make the pastry. Place the flour and butter into the bowl of a freestanding mixer and attach the paddle beater. Mix on a medium speed until the butter has been incorporated into the flour and resembles fine breadcrumbs. Add the icing sugar and mix for a few seconds before adding the egg yolk and milk. Continue to mix until a cohesive dough forms – this should only take 30-60 seconds, depending on your mixer. Turn out the pastry onto a work surface – there’s no need for more flour – and bring it swiftly together with your hands, without overworking it.
- Lay out a long sheet of cling film and place the dough on one half. Flatten the pastry with the palms of your hands, then fold the remaining cling film over the top, fully encasing the dough. Roll out swiftly between the cling film to an approximate depth of 5mm, trying your best to keep it in a circular shape. Place in the fridge for at least an hour before using.
- After resting, line, blind bake and trim a pastry case (using a rectangular, fluted, loose-bottomed tart tin measuring 30 x 12 x 2.5cm). Any spare pastry can be cut into shapes, baked separately and added to the tart for extra decoration.
- Make the crème pâtissière by adding the egg yolks and one-third of the sugar to a large bowl. Whisk until the yolks are pale and have some volume, then add the flour, whisking to combine. In a large saucepan, bring the milk, the remaining sugar and the vanilla to the boil, removing from the heat as soon as it does. Pour a little of the hot milk over the egg yolk mixture, whisking continuously, then add the remainder.
- Pour the custard back into the pan and bring to a gentle boil again. Allow the custard to bubble and thicken for about 2 minutes, whisking throughout. Once thickened, remove from the pan and place in a bowl, covering the surface with a layer of cling film before it cools, to prevent a skin forming. Allow to cool completely, then keep in the fridge until needed.
- Preheat the oven to 180ºC.
- Cut the rhubarb into long pieces tht fit into a roasting tray. Toss with the sugar and add some spices, if desired, then squeeze over the clementine juice or pour over the water. Roast in the oven for 15-20 minutes, depending on the thickness of the stems. When tender yet still intact, remove the rhubarb from the tray to a plate lined with a clean tea towel and allow to cool. Discard the spices, if used. Once cool, cut into bite-size pieces and place to one side.
- Wash and prepare the other fruit – varying how you slice each will add interest and texture to the finished tart.
- Whisk the cooled crème pâtissière vigorously until smooth, then spoon a generous layer over the prepared pastry case, levelling it off. Start placing the fruit over the custard, being decorative and creative in the design, until it has been completely covered. Tuck any baked pastry pieces that may have been made in and around the tart, then add extra little dots of crème pâtissière to highlight the design. Finish with some Greek basil leaves and edible flowers, if you like, remembering that these are added for their flavour, not just for décor. Best served at room temperature.
Gluten-Free Lemon Meringue Pie (Makes 2 Pies, Each Serving 6)
Making a lemon meringue pie using gluten-free pastry was a challenge – the pastry itself was a labour of love, and after finally getting that part right, I discovered the pre-baked pastry altered considerably when filled with the lemon custard, which took me back to square one. With some final tweaks and a slight compromise on the texture of the lemon layer, this pie has everything a standard gluten-based lemon meringue pie has – crisp, delicious pastry, a tart and creamy filling, and a crunchy yet soft-centred meringue top. As you’re not creating a pie lid, there is enough pastry to make two cases. I have doubled the fillings and toppings, so this recipe makes two pies – one for you and one for a friend.

INGREDIENTS
For the sweet gluten-free pastry:
- 35g of ground almonds (for a stronger flavour, use ground hazelnuts)
- 40g of brown rice flour
- 50g of juwar flour
- 35g of tapioca flour
- 30g of cornflour, plus extra for dusting
- 15g of amaranth seeds, ground
- 1/2 tsp of fine salt
- 115g of unsalted butter, very cold, cut into 1cm cubes
- 1 egg yolk
- 50ml of cold milk
For the filling:
- 100g of caster sugar
- 60g of cornflour
- Juice of 4-5 lemons
- 6 egg yolks (save the whites for the meringue topping)
- 450ml of double cream
For the meringue:
- 130g of egg whites
- 250g of caster sugar
- 1 tbsp of cornflour
METHOD
- First, make the pastry. In the bowl of a freestanding mixer, place all of the dry ingredients and the butter, then attach the paddle. Mix on a medium speed until the butter has been incorporated into the flour – bigger, unevenly distributed pieces of butter are fine, as this will help the pastry to flake and be less cardboard-like when baked (as is characteristic of gluten-free pastry).
- Add the egg yolk and the milk, and continue to mix until a cohesive dough forms – this should take only 30-60 seconds, depending on your mixer. If the pastry seems overly wet at this point, add an extra tablespoon of brown rice flour and re-mix.
- Lay out a long sheet of cling film and place the pastry on one half, then flatten it down with the palms of your hands and fold the remaining cling film over the top, fully encasing the dough. Roll out between the cling film to an approximate depth of 5mm, trying your best to keep it in a circular shape. Place in the fridge for at least an hour to rest.
- After resting in the fridge, roll it out between two sheets of non-stick baking paper (a gentle dusting of cornflour might be beneficial). Blind bake two pastry cases, using two deep, fluted, loose-bottomed 18 x 3cm circular tart tins.
- To make the filling, place the sugar, cornflour and lemon juice in a heatproof bowl and mix well. Stir in the egg yolks to combine.
- Heat the cream in a saucepan until it is just starting to boil, then pour a little onto the egg mixture, whisking well before slowly pouring in the remainder. Return the mixture to the pan and bring back to the boil, whisking continuously. Once boiling, reduce the heat and simmer for a minute or two. Fret not if the appearance changes, it is only a reaction between ingredients that will be rectified later. Remove from the heat and allow to cool fully.
- Pour the cooled custard into a food processor and blend until smooth, then pour into the pre-baked pastry cases, levelling out with a palette knife.
- Preheat the oven to 100ºC.
- To make the meringue, pour the egg whites into the clean bowl of a freestanding mixer and attach the whisk. Whisk on a medium speed for a few minutes until the whites stiffen to soft peaks (test by tipping the bowl; if the egg whites slide, mix a little longer). Mix together the sugar and cornflour and add this, one tablespoon at a time, to the egg whites with the whisk running continuously. When all of the sugar has been incorporated, turn the speed to low and whisk for 2 minutes more or until no sugar crystals can be felt between your fingers.
- Spoon the meringue over the lemon layers, spreading it out gently across the surface. Do make sure you bring the meringue right to the very sides of the pastry cases as this creates a blanket of insulation for the creamy filling below. Push the meringue around with the back of a spoon, swooshing and swirling to create texture, then bake in the oven for 1 hour, after which time the meringue’s exterior will be crisp yet the inside still soft. Switch off the oven, leaving the pies inside for 30 minutes more, without opening the oven door.
- Remove from the oven and allow to cool for 15 minutes before removing the tins. Serve warm or allow to cool completely if preferred – pouring cream is optional.
The Pastry School by Julie Jones is published by Kyle Books, RRP £25.
Follow @Julie_JonesUK
/https%3A%2F%2Fsheerluxe.com%2Fsites%2Fsheerluxe%2Ffiles%2Farticles%2F2020%2F04%2Fpastry-school-book.jpg)
DISCLAIMER: We endeavour to always credit the correct original source of every image we use. If you think a credit may be incorrect, please contact us at info@sheerluxe.com.
/https%3A%2F%2Fsheerluxe.com%2Fsites%2Fsheerluxe%2Ffiles%2Fwebsite-images%2F2025%2F03%2Fsign-up-pop-up.jpg)
