A Look Around Bee Osborn’s Shepherd’s Hut
The Solution
“I’m in the middle of renovating my cottage and knew I needed a home close by, so I decided to erect a shepherd’s hut in the garden. I’ve actually dreamt of having one for years, so this was the perfect opportunity. I knew it was going to be my home for about a year while I wait for planning permission and building work to complete, so it needed to have a functioning bathroom and kitchen at the very least. Eventually, it will be a self-contained space for one of my daughters.”

The Design
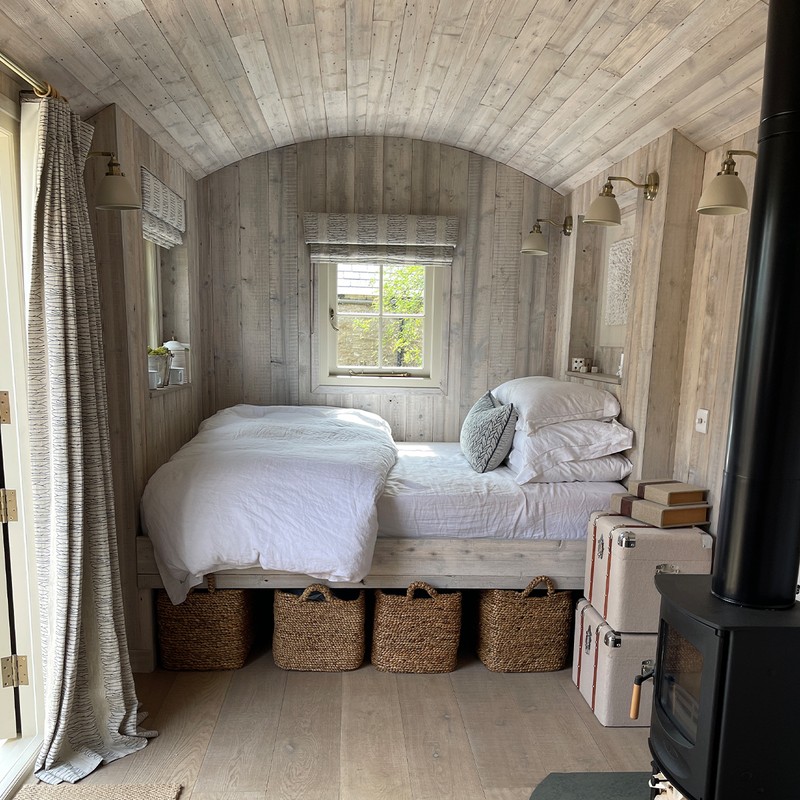
“We designed the hut with Arbor Shepherd Hut. While I loved the designs I asked the team if they would mind if we switched things up a bit. I was adamant about the headboard looking different to how they usually do in shepherd’s huts, for example. It was lovely to be able to put my own stamp on it. I wanted it to mimic my bedroom from my first cottage and also give me a flavour of what is to come in the new cottage. It is like a mini version of both, which keeps me motivated during the challenging moments of the bigger renovation.”
The Practicalities
“Access to utilities is the tricky part – you need to arrange for water, electricity and soil pipes to all be in the correct position and connected up before you do anything. You also need to create a hardcore base with cement footings under each wheel, so it needs careful planning. It was constructed off site and it was a bit touch and go as to whether it would fit, but any good shepherd's hut company should do a site survey first.
“The hut has remained surprisingly cool this summer – maybe due to the number of windows. I know it will be so cosy this winter, though, with the wood burner and underfloor heating. The best thing about it is that it takes only an hour to clean from top to bottom. The worst is making the bed – it’s difficult to get to those far edges!”


The Layout
“Shepherd’s huts are usually as wide as the length of a double bed but that only leaves 20cm at each end. We therefore brought the walls in slightly and added in-built shelving, including a nook above the bed with plugs and a space to put a book or a glass of water. It actually helped to separate the living area from the sleeping area, albeit in a subtle and gentle way.
“There’s a shower in the bathroom, a proper working loo and a basin in the kitchen. I have a fridge with mini freezer compartment, a kitchen sink, and in the built-in cupboard there’s a microwave and coffee machine. There’s only a toaster and kettle out on the worktop. I contemplated having a two-ring induction hob on the top but because it will eventually become a spare room, it probably wouldn’t get used much. I also have a BBQ outside and could easily get a microwave oven or detachable induction hot plate.”
The Storage
“I decided to put baskets under the bed to act as drawers, so they could be pulled out easily. It was cheaper than building cupboards and leaves space behind the baskets for suitcases. Beds are typically quite high in shepherd's huts – it used to be the case that lambs were kept under them, so it’s a lovely big space for storage. There’s a large full-height cupboard opposite the kitchen and lots of hooks in the bathroom. I also have two trunks stacked on top of each other next to the bed, which act as a bedside table and double up as storage at the same time.”

Bee’s Five Need-To-Knows For Building & Renovating A Shepherd’s Hut…
1. Do a site survey to check there’s sufficient room to install it.
2. The further away you place it from a house, the more expensive the plumbing will be.
3. Do lots of research into companies as prices and quality vary enormously.
4. If you are planning to rent it out, you are likely to need planning permission, but it varies from council to council.
5. Work out what you want it to be used for, so you have a clear idea of what needs to be installed and why.
DISCLAIMER: We endeavour to always credit the correct original source of every image we use. If you think a credit may be incorrect, please contact us at info@sheerluxe.com.
/https%3A%2F%2Fsheerluxe.com%2Fsites%2Fsheerluxe%2Ffiles%2Fwebsite-images%2F2025%2F03%2Fsign-up-pop-up.jpg)
