How To Cook With Miso At Home
What Is Miso?
Miso translates as ‘fermented beans’ in Japanese. A traditional ingredient in Japanese and Chinese diets, miso paste is made from fermented soybeans and grains. There are hundreds of different types of miso and individual varieties are linked with regional cuisines.
In Japan, people traditionally start their day with a portion of rice, pickles and a bowl of miso soup – mainly to stimulate digestion. This pairing of plain rice and miso soup is considered a fundamental part of Japanese cuisine and it’s unusual not to be served this punchy broth with a meal. The protein-rich paste is a popular condiment, providing instant flavour by adding ‘umami’ – a recently recognised fifth taste akin to ‘savoury’ – to soups and dressings, vegetables, stews, glazes, marinades and even desserts.
How Is It Made?
Like all fermented foods, miso's flavour profile is created by the compounds produced through the fermentation process. Miso consists of a starter culture called koji – a combination of grains or soya beans multiplied with aspergillus oryzae mould spores. The miso goes through a two-step process; once the koji has been cultivated, it is then combined with soybeans and a grain (usually rice, barley or rye), before being left to enzymatically digest, ferment and age. The fermentation period can last from anywhere between two months and over three years.
What Are The Health Benefits Of Miso?
This low-calorie paste is a great source of copper, manganese, zinc, various B vitamins, vitamins E and K, and folic acid. It’s also an excellent source of protein, making it popular among vegans and vegetarians. Due to its fermentation process, miso contains millions of beneficial bacteria and is rich is enzymes. These enzymes create probiotics, thought to aid digestion, absorption and assimilation of nutrients. A word of warning: the more aged the miso, the higher the salt content.
Choosing Your Miso
These days you’ll find miso in one form or another in almost every supermarket. If not, the Japan Centre in London offers myriad miso options – and all are available to buy online. Here are six types to get you started:
Shiro Miso: White Miso
Shiro miso, also known as white miso, is made from soybeans and rice which are fermented for two months. Light in colour, with a sweet and mildly salty flavour, shiro is a great starter miso, as it’s versatile and provides a kick to dressings and vegetables. Its creamy texture and taste make it a popular dairy substitute in dishes like mashed potato.
Aka Miso: Red Miso
If a recipe calls for dark miso, you’ll want to opt for red. Dark red in colour, aka miso is made from a higher proportion of soybeans and fermented for up to three years: expect a saltier, deeper flavour which lends itself best to hearty dishes like stews, soups and tomato sauces. It also makes a great addition to gravy.
Shinsu Miso: Yellow Miso
Another mild form of the paste, yellow miso is fermented for slightly longer than white miso. Yellow miso’s mildness makes it another versatile ingredient, but we think it works best on fish or as a soup base.
Mugi Miso: Barley Miso
Made from barley and soybeans, mugi miso usually has a longer fermentation process than most. Expect a strong barley aroma, but a mild and slightly sweet flavour. An addition that works best in soups, stews and sauces.
White Miso Glaze
This is the jar to buy if you want a speedy supper. It’s a ready-to-go glaze made by combining white miso paste, soy sauce, sesame oil and sugar. Simply spread onto fish and vegetables – such as an aubergine – and grill.
Miso Instant Soup
For a quick fix, you can’t go wrong with a packet of instant miso soup. At around 18 calories per cup, it’s an ideal snack for satisfying hunger pangs (especially if you add nori sheets and a handful of cooked noodles). An ideal introduction to miso for those wanting to try it.
SHOP OUR FAVOURITES


How To Cook With Miso
We asked Tim Anderson – self-confessed Japanophile, former MasterChef winner and bestselling cookbook author – to tell us why miso is a must-use ingredient…
What Does Miso Taste Like?
It is always salty and always umami, but depending on the age of the ingredients and its production method, it can be all kinds of things: light, fresh, and fruity at one end of the spectrum; nutty, malty and meaty in the middle. The really old stuff has notes of prune, chocolate and balsamic vinegar.
Can You Share Your Quick Dinner Miso Tips?
Mix miso with something to slacken it and take the edge off its salinity: mirin, sake, dashi, wine or plain water work well. Season to taste with a bit of sugar and/or vinegar. It can be used on all kinds of things – as a dressing for green veg or as a marinade. As a rule of thumb, use lighter miso for fish and darker miso for strongly flavoured meat like lamb or pork. Miso benefits immensely from a bit of caramelisation so it’s especially nice basted onto roasted or grilled dishes.
If You’ve Never Used Miso Before, What’s The Best Way To Try It?
Taste the miso first and think about its flavour profile. Lighter miso that’s fresh, tangy and salty is good in dishes where you might use a sharp cheese such as parmesan or pecorino. Adding miso to cheese sauce is a fantastic flavour enhancer. Richer miso is more like Marmite or tomato puree, so it’s best used as the basis for hearty dishes like meat stews, pasta sauces and even curries.
Visit Amazon.co.uk & follow Tim on Instagram at @ChefTimAnderson.
FEEL INSPIRED?
Try Out 3 Of Our Favourite Miso Recipes
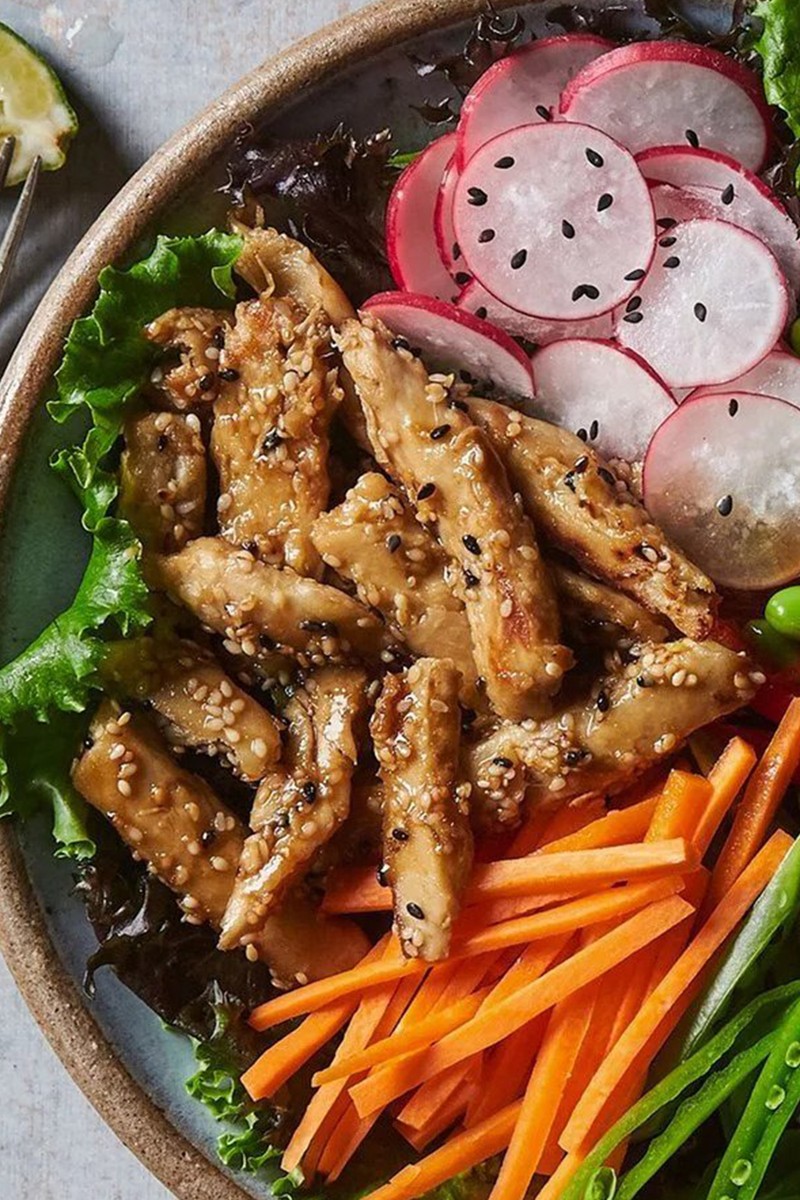
Miso & Tamari No-Chicken Salad
Heat the oil in a wok or frying pan, add the sesame seeds and No-Chicken pieces and stir fry until golden. Stir in the ginger and garlic and cook for a further 30 seconds.
In a small jug whisk together the miso paste, tamari sauce and sesame oil with 2 tablespoons of water. Add half the mixture to the No-Chicken and stir to coat. Set aside to cool.
Cook the edamame beans in boiling water for 2 minutes, drain and rinse in cold water. Thinly slice the spring onions, radish, mange tout and peppers and cut the carrot into matchstick strips.
Heap the salad leaves into 2 bowls, top with the edamame beans and sliced vegetables – arrange them in sections if you like – then finally add the No-Chicken. Drizzle over the remaining tamari dressing and serve with the wedge of lime.
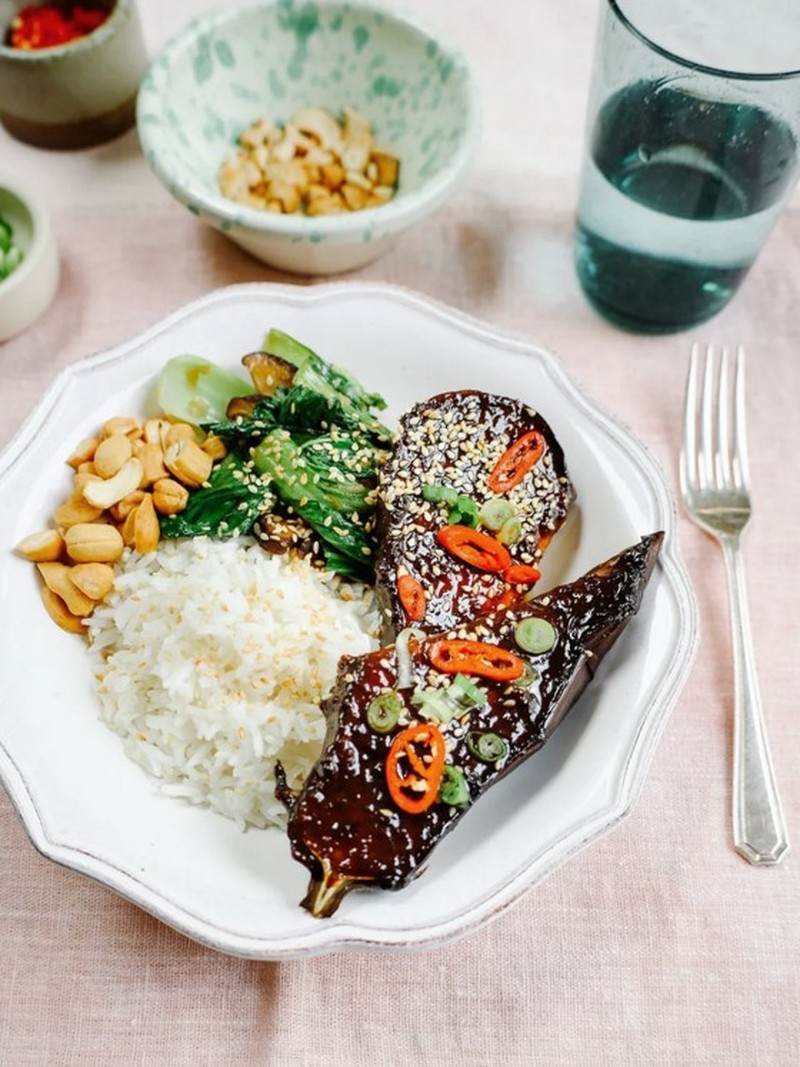
Miso-Glazed Aubergine Rice Bowl With Garlicky Greens & Cashews
Preheat your oven to 200°C. Line a baking tray with parchment or foil.
Slice the aubergines in half lengthways and score them criss-cross with a sharp knife (go about a third deep).
Place the aubergines onto the tray and bake for about 30 minutes until they are browned in areas and cooked through. They should be squidgy to touch when you squeeze them.
In a small bowl whisk together the miso paste, honey, toasted sesame oil and mirin with a fork to a smooth paste.
When the aubergines have cooked remove them from the oven and spoon over the miso glaze.
While the aubergine cooks, cook your rice (according to packet instructions) and cook your greens.
Chop the base of the pak choi. Separate the leaves and stalk. Chop stalk into roughly inch sized pieces and halve the leaves widthways.
Heat the oils in a pan. Add the mushrooms and a pinch of salt. Cook until the mushrooms are soft and browned.
Add the grated ginger and garlic and cook for one minute. Then add the pak choi and cook until the leaves have wilted.
Add the tamari/soy sauce and the rice wine vinegar and stir to combine.
To serve, tip the rice into bowls. Top with pak choi, the miso aubergine, toasted sesame seeds, chopped spring onions, sliced red chilli and chopped roasted cashews.
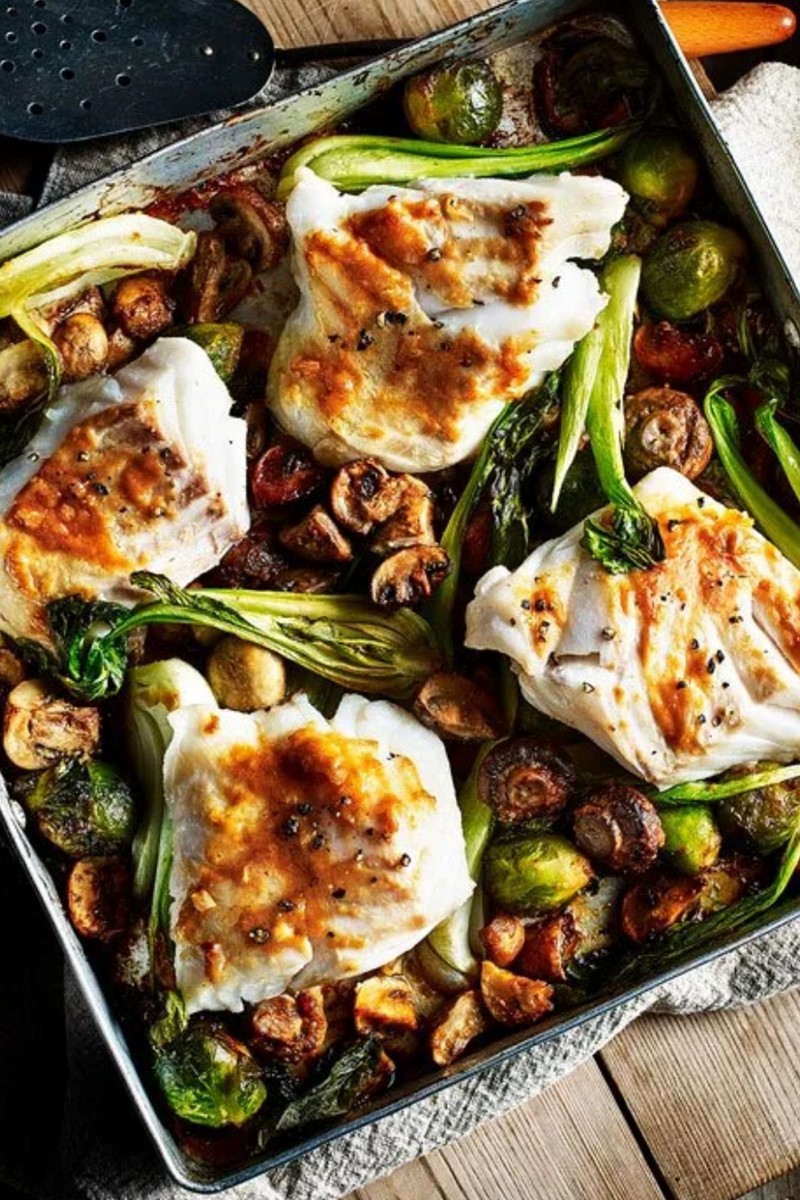
Baked Miso Cod
Preheat oven to 220°C/200°C Fan.
Bring a large pan of salted water to the boil and add the sprouts. Cook for 5 minutes until tender. Drain.
In a bowl, mix the miso paste with the garlic and softened butter until combined. Take a tbsp of this mixture and put it aside to top the fish with.
To the rest, add the mushrooms and sprouts and coat thoroughly (it might be easier to use your hands). Transfer everything to a large baking paper lined tray and place in the oven for 15 minutes.
Add the pak choi to the tray and mix thoroughly to coat with the miso. Top the skin side of the cod fillets with the remaining miso paste and place on top of everything for a final 10-12 minutes, until the fish is cooked.
DISCLAIMER: We endeavour to always credit the correct original source of every image we use. If you think a credit may be incorrect, please contact us at info@sheerluxe.com.
/https%3A%2F%2Fsheerluxe.com%2Fsites%2Fsheerluxe%2Ffiles%2Fwebsite-images%2F2025%2F03%2Fsign-up-pop-up.jpg)
